
Apache Flink quickstart with Kotlin and Gradle

In this blog post, we are going to write a simple Flink job that will read from Kafka and count number of word occurrences. We will set up local Flink and Kafka using docker and redpanda.
Why Flink?
Apache Flink is a distributed streaming processing system.
Why do we need a streaming processing system? Imagine that you are building a recommendation engine for an app, something like Instagram feed. You want to run a simple job like “aggregate total number of likes per every post”. With batch systems - SQL (BigQuery), MapReduce (Apache Spark, Hadoop) - you will have to run a batch job to update the values.
Something like this:
create or replace table `aggregated_counts` as
select count_if(even_name = “like”) as like_count
from `user_events`
group by post_id
This is not really “updatable” as it always selects from the entire set of data.
We can make this incremental, but also a bit more complex:
create or replace table `new_counts` as
select coalesce(old.like_count, 0) + coalesce(new.like_count, 0) as like_count
from `old_counts` as old outer join `new_counts` as new using post_id
We still can’t run this job too often, because we are doing a join to the entire data aggregated so far, and because of the nature of large distributing processing systems - having a lot of overhead on launching lots of workers, orchestration, reading and writing replicated persisted data and so on. For the actual scale of Instagram, I doubt it will be cost effective to do this more often than once every few hours, meaning that every like in the post will be used by your system only a few hours later.
With streaming, it will look more like this:
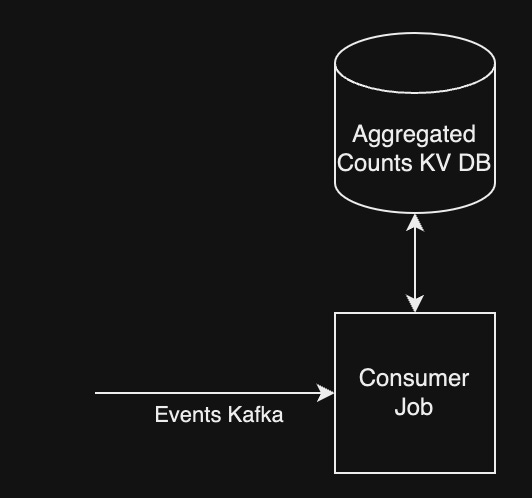
The job reads events from an input topic (kafka, for example). If it is indeed a like event, it fetches the previous counter from the KV DB, increments it, and puts it back again. So for 1 event we are doing O(1) job instead of O(N) join that we did before. In practice, this allows maintaining the counter with delay of only a few seconds.
Of course, real streaming processing is much more complex than that. How do we distribute it to scale up to huge amounts of data while maintaining synchronous access? What do we do if one of the workers fail and we need to replace it? This is exactly why we need a system like Flink to take care of all those important, but messy details.
Apache flink is one of the two open source streaming processing systems that I am aware of. Apache Beam is the second one, but it is quite slow and costly, as demonstrated in my other blog post. A lof of other “brands”, like Google Dataproc, Databricks, Amazon Glue and so on are actually just organisation systems build on top of Flink, among others.
Why Kotlin and Gradle?
This is just my personal decision, and it is actually not ideal. Other alternatives are Python, SQL, Java or Scala. To me, Kotlin just seemed like a “freshier” solution. I never wanted to learn Java or Scala, at least not in 2023.
Kotlin is supposed to be fully interoperable with Java, so it should work in the same places where Java works. However, most of the existing tutorials and examples are actually written in either Java or Scala, so if you are being serious about Flink with Kotlin, get ready to learn to translate those.
Gradle is one of the two major build systems for Kotlin, the other one being Maven (curiously also built by Apache foundation, just like Flink). It seems to be gaining popularity with respect to Maven - all the companies I’ve worked with in the recent years used Gradle for Kotlin, and so do all Android developers, it seems. Nevertheless, the market is still contested, so a lot of online tutorials and examples will use Maven, so we will have to learn to translate Maven to Gradle as well.
Installing Flink
It is crucial to start with this step to avoid future problems. I’ve learned that Flink won’t work as a program on Mac M1, but I was able to make it work on M1 with docker. I still couldn’t manage to make some functionality work, like printing and PrintSink() - so if you can, you should opt for linux-based os (on a cloud vm, perhaps) instead of local development on Macos. I recommend starting with Docker as well, it helps avoid such problems as Kafka using the same port as Flink, for example.
First, let’s get some files from here, and follow installation instructions. I chose version 1.17.1 for myself. This will download a .tar.gz file to your computer, which you can then unpack like this:
tar -xzf flink-*.tgzI simply put it into ~/bin on my mac. We will only use a script to actually run the flink jobs, which is located at
~/bin/flink-1.17.1/bin/flinkAfterwards, let’s grab the docker-compose.yml from here. Here is the content:
version: "2.2"
services:
  jobmanager:
    image: flink:latest
    ports:
      - "8081:8081"
    command: jobmanager
    environment:
      - |
        FLINK_PROPERTIES=
        jobmanager.rpc.address: jobmanager

  taskmanager:
    image: flink:latest
    depends_on:
      - jobmanager
    command: taskmanager
    scale: 1
    environment:
      - |
        FLINK_PROPERTIES=
        jobmanager.rpc.address: jobmanager
        taskmanager.numberOfTaskSlots: 2
And now run
docker compose up -dfrom the same directory. It will start up 2 containers in the background. Navigate to
http://localhost:8081/, and you should see Flink’s WebUI, looking something like this:
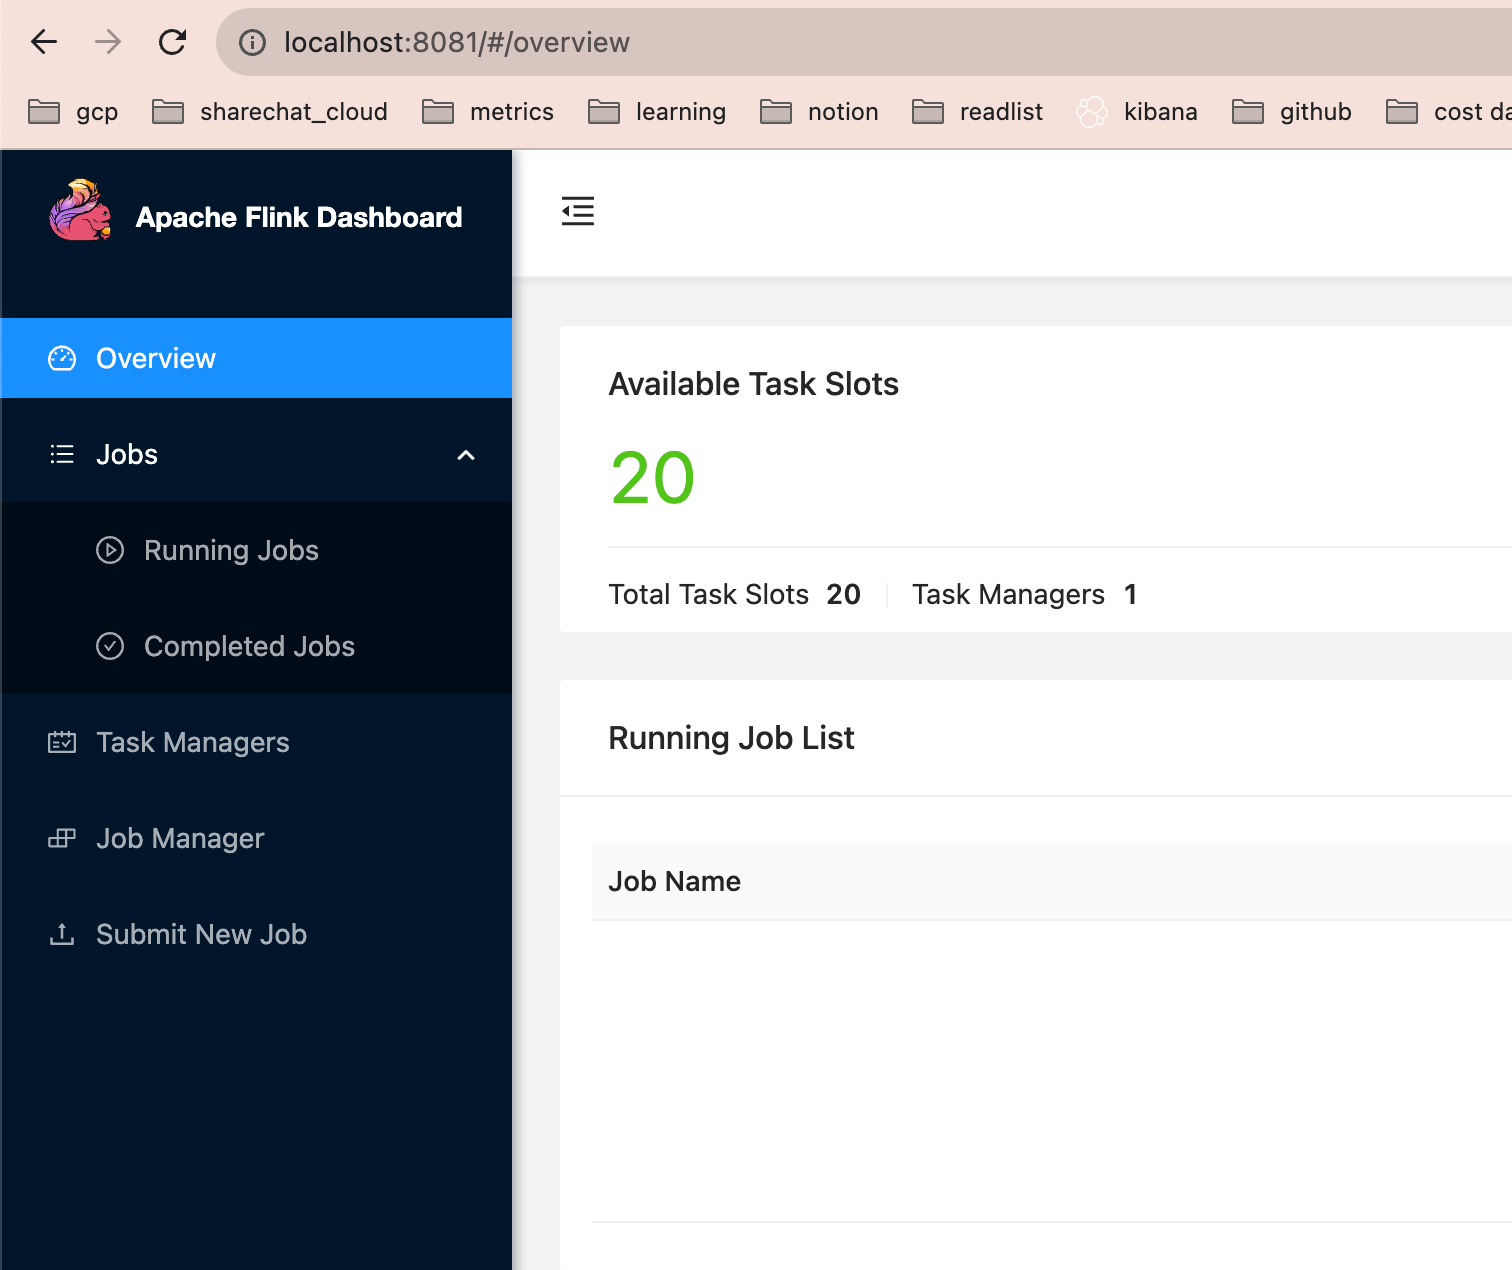
“Running Jobs” list currently should be empty.
Creating a stub gradle project
Make sure gradle is installed on your system, and then run:
gradle initGradle is not just a build tool for Kotlin, it can technically be used to build other languages as well. Because of this, we will have to go through a rather long questionnaire just to set up the “Hello World” project application for Kotlin.
Select type of project to generate: application
// this is the language you will write code in
Select implementation language: Kotlin
Generate multiple subprojects for application: no
// this is the language you will write the build code in
Select build script DSL: kotlin
Project name: my_project
Source package: my_package
Enter target version of Java (min. 7) (default: 11): 11
Generate build using new APIs and behavior (some features may change in the next minor release)?: no
DSL language is the language used to write Gradle configuration itself. Choices are Gradle (old) and Kotlin (new). I chose Kotlin, because I am learning Kotlin anyway. However, once again, a lot of online docs and tutorials still use Groovy (Apache Flink official docs included), so we will have to learn to translate that as well.
At the time of writing, the maximum java version supported by Flink was 11. Make sure that the same Java version is installed on your machine as well.
Now do this:
git add .
git status .
This adds files to the source control (necessary if you want the project to work after checking it out from another machine), and lets us have a glimpse at the file structure:
new file:   .gitattributes
new file:   .gitignore
new file:   app/build.gradle.kts
new file:   app/src/main/kotlin/_word_count/App.kt
new file:   app/src/test/kotlin/_word_count/AppTest.kt
new file:   gradle/wrapper/gradle-wrapper.jar
new file:   gradle/wrapper/gradle-wrapper.properties
new file:   gradlew
new file:   gradlew.bat
new file:   settings.gradle.kts
Gradle wrapper, or gradlew: gradle did a lot of breaking changes in its development. Because of this, running builds of the same project with different gradle versions might either not work at all, or work incorrectly. This is why it is crucial to run builds with exactly the same version of gradle all the time. To ensure that, gradle provides the “wrapper”: it is a bunch of configuration files and scripts that remember which version of gradle was used to generate the project; running gradlew instead of gradle on any machine will download the correct version from the internet, and use it for the actual build. Make sure to always use gradlew instead of just gradle.
settings.gradle.kts is a build configuration file for the entire project.
build.gradle.kts is a build configuration file for the main program. We will primarily write our build config updates here.
AppTest.kt - testing script.
App.kt - the actual code of our program. Right now it should just print “Hello world!”
You can run this to build the program and check how it works:
./gradlew runIt should print “Hello world!”.
Writing the actual flink job
Put this into your App.kt:
@file:JvmName("WordCount")

import org.apache.flink.api.common.eventtime.WatermarkStrategy
import org.apache.flink.api.common.functions.FlatMapFunction
import org.apache.flink.api.common.functions.ReduceFunction
import org.apache.flink.api.common.serialization.SimpleStringSchema
import org.apache.flink.api.connector.source.Source
import org.apache.flink.connector.kafka.source.KafkaSource
import org.apache.flink.connector.kafka.source.enumerator.initializer.OffsetsInitializer
import org.apache.flink.streaming.api.datastream.DataStream
import org.apache.flink.streaming.api.environment.StreamExecutionEnvironment
import org.apache.flink.streaming.api.functions.sink.PrintSink
import org.apache.flink.streaming.api.windowing.assigners.TumblingEventTimeWindows
import org.apache.flink.streaming.api.windowing.time.Time
import org.apache.flink.util.Collector


const val TOPIC = "input"
const val KAFKA_SERVER = "localhost:9092"

data class Event(var word: String, var count: Int) {
    constructor() : this("", 0)
}

class Tokenizer : FlatMapFunction<String, Event> {
    override fun flatMap(line: String, out: Collector<Event>) {
        line.lowercase()
            .split("\\W+")
            .forEach { word ->
                out.collect(Event(word, 1))
            }
    }
}

class Sum : ReduceFunction<Event> {
    override fun reduce(value1: Event, value2: Event): Event {
        return Event(value1.word, value1.count + value2.count)
    }
}

fun main() {
    val env = StreamExecutionEnvironment.getExecutionEnvironment()

    println("Trying kafka from $KAFKA_SERVER")
    val source = KafkaSource.builder<String>()
        .setBootstrapServers(KAFKA_SERVER)
        .setTopics(TOPIC)
        .setStartingOffsets(OffsetsInitializer.earliest())
        .setValueOnlyDeserializer(SimpleStringSchema())
        .build()


    val textLines = env.fromSource(
        source,
        WatermarkStrategy.forMonotonousTimestamps(),
        "Words"
    ).setParallelism(1)

    val counts = textLines
        .flatMap(Tokenizer())
        .name("tokenizer")
        .keyBy { value -> value.word }
        .window(TumblingEventTimeWindows.of(Time.seconds(5)))
        .reduce(Sum())
        .name("counter")

    counts.writeAsText("my_file.txt")

    env.execute()
}
Let’s go over this bit by bit.
data class Event(var word: String, var count: Int) {
    constructor() : this("", 0)
}


class Tokenizer : FlatMapFunction<String, Event> {
    override fun flatMap(line: String, out: Collector<Event>) {
        line.lowercase()
            .split("\\W+")
            .forEach { word ->
                out.collect(Event(word, 1))
            }
    }
}

class Sum : ReduceFunction<Event> {
    override fun reduce(value1: Event, value2: Event): Event {
        return Event(value1.word, value1.count + value2.count)
    }
}
The input is a kafka topic - a stream of messages, each message just being a string in a plaintext format. We want to run 2 transformations on these: first, tokenise input strings, turning each input message into potentially many messages, containing individual words. Then, we reduce them by word. Reducer receives messages from various mappers, and aggregates counts using the binary reduce function.
Mapper and reducer will potentially be on different nodes, and they need to serialise data for communication. That is why we have a “data class” defined - serialisation is generated automatically for it.
val env = StreamExecutionEnvironment.getExecutionEnvironment()Environment is a singleton object that we can use to actually define the job graph for Flink job.
val source = KafkaSource.builder<String>()
        .setBootstrapServers(KAFKA_SERVER)
        .setTopics(TOPIC)
        .setStartingOffsets(OffsetsInitializer.earliest())
        .setValueOnlyDeserializer(SimpleStringSchema())
        .build()
val textLines = env.fromSource(
        source,
        WatermarkStrategy.forMonotonousTimestamps(),
        "Words"
    ).setParallelism(1)
We define input that will read from Kafka, specifying address and topic name. We deserialise content as plaintext string, and we start with the earliest available offset, meaning that the job will always start reading from the beginning of the topic.
We won’t dive into watermark concept just yet.
Then we turn the Kafka source into a DataStream by calling env.fromSource - turning it into a starting point for our job graph.
val counts = textLines
    .flatMap(Tokenizer())
    .name("tokenizer")
    .keyBy { value -> value.word }
    .window(TumblingEventTimeWindows.of(Time.seconds(5)))
    .reduce(Sum())
    .name("counter")
Map is simple: it generates output rows for every input row. Flat map “flattens” the result, if one input row produces an array of output rows.
For reduce, we need to specify 2 things: keyBy function - which key to use for aggregation, and aggregation window.
Aggregation windows explained: In batch processing, like simple SQL, we could simply write
select sum(count) from tokenized_words group by wordWhat that will do is read the entire input, wait for the entire map stage to complete, and only then start processing reduce stage, counting the actual input words. This is only possible because input is bounded.
Kafka source is unbounded - it might never end. So instead of going over the entire input data, we have aggregation window: we read only 5 seconds worth of input, aggregate the counts for everything within that window, output the result, and then proceed to the next window. Downside of this is that instead of getting the “global” word count, we only get the “local” count within the current window.
counts.writeAsText("my_file.txt")

env.execute()
Normally, we would want to write either to another Kafka topic, or to a cloud database. For debugging purposes, local file will do - but it will save the data to the file on the taskmanager, not on the local machine that was used to start the job.
Now, put this into your build.gradle.kts:
/*
 * This file was generated by the Gradle 'init' task.
 *
 * This generated file contains a sample Kotlin application project to get you started.
 * For more details on building Java & JVM projects, please refer to https://docs.gradle.org/8.3/userguide/building_java_projects.html in the Gradle documentation.
 */
plugins {
    // Apply the org.jetbrains.kotlin.jvm Plugin to add support for Kotlin.
    id("org.jetbrains.kotlin.jvm") version "1.9.0"

    // Apply the application plugin to add support for building a CLI application in Java.
    application
}

val flinkVersion = "1.17.1"

repositories {
    // Use Maven Central for resolving dependencies.
    mavenCentral()
}

dependencies {
    // Use the Kotlin JUnit 5 integration.
    testImplementation("org.jetbrains.kotlin:kotlin-test-junit5")

    // Use the JUnit 5 integration.
    testImplementation("org.junit.jupiter:junit-jupiter-engine:5.9.3")

    testRuntimeOnly("org.junit.platform:junit-platform-launcher")

    // This dependency is used by the application.
    implementation("com.google.guava:guava:32.1.1-jre")

    // kotlin stdlib to be used in flink
    implementation("org.jetbrains.kotlin:kotlin-stdlib:1.9.0")

    // flink runtime
    implementation("org.apache.flink:flink-streaming-java:${flinkVersion}")

    implementation("org.apache.flink:flink-connector-kafka:${flinkVersion}")
}

// Apply a specific Java toolchain to ease working on different environments.
java {
    toolchain {
        languageVersion.set(JavaLanguageVersion.of(11))
    }
}

tasks.jar {
    isZip64 = true
    manifest.attributes["Main-Class"] = "WordCount"
    val dependencies = configurations
        .runtimeClasspath
        .get()
        .map(::zipTree)
    from(dependencies)
    duplicatesStrategy = DuplicatesStrategy.EXCLUDE
    exclude("META-INF/*")
    exclude("org/apache/flink/*")
    exclude("org/scala-lang/*")
}
Delete the AppTest.kt file, because the test will no longer work.
Let’s go over new content line by line:
val flinkVersion = "1.17.1"
dependencies {
    // kotlin stdlib to be used in flink
    implementation("org.jetbrains.kotlin:kotlin-stdlib:1.9.0")

    // flink runtime
    implementation("org.apache.flink:flink-streaming-java:${flinkVersion}")

    implementation("org.apache.flink:flink-connector-kafka:${flinkVersion}")
}
The output artefact of gradlew build is a .jar file - a jvm archive containing all the necessary information to be run by jvm. In our case, instead of running this on our local jvm, we will be sending it to Flink master, which doesn’t know anything about kotlin. Since our code implicitly uses kotlin stdlib, we have to compile it into the .jar itself.
Next, we set dependencies for flink and kafka connector. They will be downloaded from Maven repository, that was already set up before, on gradle init stage.
tasks.jar {
    isZip64 = true
    manifest.attributes["Main-Class"] = "WordCount"
    val dependencies = configurations
        .runtimeClasspath
        .get()
        .map(::zipTree)
    from(dependencies)
    duplicatesStrategy = DuplicatesStrategy.EXCLUDE
    exclude("META-INF/*")
    exclude("org/apache/flink/*")
    exclude("org/scala-lang/*")
}
Next, we specify the task to build the so-called fat jar or shadow jar, a jar with all the dependencies compiled into it, so that it doesn’t depend on dynamic libraries that might be part of our local jvm, but not flink’s jvm. We make sure to include all dependencies, but exclude stuff that actually is part of flink and will be present on job executor’s jvms - flink itself and scala.
We also specify the proper entrypoint for the program.
Build the jar:
./gradlew buildAnd run it using the flink tool that we’ve downloaded before:
/bin/flink-1.17.1/bin/flink run app/build/libs/app.jarIf all went well, the job will briefly appear in our Flink WebUI, but then fail with a huge wall of java stacktraces, among which - an exception looking something like this:
Caused by: java.lang.RuntimeException: Failed to get metadata for topics [input].This makes sense, because we haven’t set up our kafka topics yet. Let’s do this now!
Setting up kafka topics using redpanda
Redpanda is a faster, c++ based implementation of Kafka. It has exactly the same API, so we can use it instead of kafka.
It’s easy to set up with docker, we can get the compose file from the official site: link
Just launching this docker compose file as-is will create a redpanda container that advertises kafka on localhost:19092 on the parent machine.
However, we need kafka to be accessible by flink, which itself runs within a different docker container. Even if we can access kafka on localhost:19092 on the parent machine, it is not available from inside another container. Instead, we need to define the so-called docker bridge network and make sure to use it both for redpanda and flink.
Redpanda docker compose file already defines the bridge network:
networks:
  redpanda_network:
    driver: bridge
Now, let’s merge flink and redpanda compose files into one, and specify the same network for flink containers as well:
version: "3.7"
name: redpanda-quickstart
networks:
  redpanda_network:
    driver: bridge
volumes:
  redpanda-0: null
services:
  redpanda-0:
    command:
      - redpanda
      - start
      - --kafka-addr internal://0.0.0.0:9092,external://0.0.0.0:19092
      # Address the broker advertises to clients that connect to the Kafka API.
      # Use the internal addresses to connect to the Redpanda brokers'
      # from inside the same Docker network.
      # Use the external addresses to connect to the Redpanda brokers'
      # from outside the Docker network.
      - --advertise-kafka-addr internal://redpanda-0:9092,external://localhost:19092
      - --pandaproxy-addr internal://0.0.0.0:8082,external://0.0.0.0:18082
      # Address the broker advertises to clients that connect to the HTTP Proxy.
      - --advertise-pandaproxy-addr internal://redpanda-0:8082,external://localhost:18082
      - --schema-registry-addr internal://0.0.0.0:8081,external://0.0.0.0:18081
      # Redpanda brokers use the RPC API to communicate with eachother internally.
      - --rpc-addr redpanda-0:33145
      - --advertise-rpc-addr redpanda-0:33145
      # Tells Seastar (the framework Redpanda uses under the hood) to use 1 core on the system.
      - --smp 1
      # The amount of memory to make available to Redpanda.
      - --memory 1G
      # Mode dev-container uses well-known configuration properties for development in containers.
      - --mode dev-container
      # enable logs for debugging.
      - --default-log-level=debug
    image: docker.redpanda.com/redpandadata/redpanda:v23.2.12
    container_name: redpanda-0
    volumes:
      - redpanda-0:/var/lib/redpanda/data
    networks:
      - redpanda_network
    ports:
      - 18081:18081
      - 18082:18082
      - 19092:19092
      - 19644:9644
  console:
    container_name: redpanda-console
    image: docker.redpanda.com/redpandadata/console:v2.3.1
    networks:
      - redpanda_network
    entrypoint: /bin/sh
    command: -c 'echo "$$CONSOLE_CONFIG_FILE" > /tmp/config.yml; /app/console'
    environment:
      CONFIG_FILEPATH: /tmp/config.yml
      CONSOLE_CONFIG_FILE: |
        kafka:
          brokers: ["redpanda-0:9092"]
          schemaRegistry:
            enabled: true
            urls: ["http://redpanda-0:8081"]
        redpanda:
          adminApi:
            enabled: true
            urls: ["http://redpanda-0:9644"]
    ports:
      - 8080:8080
    depends_on:
      - redpanda-0

  jobmanager:
    image: flink:latest
    ports:
      - "8081:8081"
    command: jobmanager
    networks:
      - redpanda_network
    environment:
      - |
        FLINK_PROPERTIES=
        jobmanager.rpc.address: jobmanager

  taskmanager:
    image: flink:latest
    depends_on:
      - jobmanager
    command: taskmanager
    scale: 1
    networks:
      - redpanda_network
    environment:
      - |
        FLINK_PROPERTIES=
        jobmanager.rpc.address: jobmanager
        taskmanager.numberOfTaskSlots: 2
We added this to both taskmanager and jobmanager containers from flink:
    networks:
      - redpanda_network
This makes sure that redpanda and flink containers are on the same network, and makes them accessible.
Finally, to diagnose potential network/kafka problems, I use the kafkacat utility.
On our host machine, kafka should be available on localhost:19092:
kcat -b localhost:19092 -LThis will show something like this:
Metadata for all topics (from broker 0: localhost:19092/0):
 1 brokers:
  broker 0 at localhost:19092 (controller)
 1 topics:
  topic "_schemas" with 1 partitions:
    partition 0, leader 0, replicas: 0, isrs: 0
Now, let’s enter the actual flink container, and check if kafka is also accessible there. First, run this to list all running containers:
docker psThe output will look something like this:
CONTAINER ID   IMAGE                                                COMMAND                   CREATED         STATUS         PORTS                                                                                                              NAMES
bba84ef41e23   flink:latest                                         "/docker-entrypoint.…"    4 minutes ago   Up 4 minutes   6123/tcp, 8081/tcp                                                                                                 redpanda-quickstart-taskmanager-1
2ad89f245078   docker.redpanda.com/redpandadata/console:v2.3.1      "/bin/sh -c 'echo \"$…"   4 minutes ago   Up 4 minutes   0.0.0.0:8080->8080/tcp                                                                                             redpanda-console
c683996a9a62   flink:latest                                         "/docker-entrypoint.…"    4 minutes ago   Up 4 minutes   6123/tcp, 0.0.0.0:8081->8081/tcp                                                                                   redpanda-quickstart-jobmanager-1
983e4e2fbfbb   docker.redpanda.com/redpandadata/redpanda:v23.2.12   "/entrypoint.sh redp…"    4 minutes ago   Up 4 minutes   8081-8082/tcp, 0.0.0.0:18081-18082->18081-18082/tcp, 9092/tcp, 0.0.0.0:19092->19092/tcp, 0.0.0.0:19644->9644/tcp   redpanda-0
There are 4 containers - flink jobmanager, flink taskmanager, redpanda and redpanda console.
Copy the id of one of the flink containers, and connect to it like that:
docker exec -it bba84ef41e23 bash“docker exec” execute a command inside the container. “-it” runs it in interactive mode, which is what we need if we just run a terminal. Finally, “bash” just says to execute the “bash” command in the container, entering a terminal.
Setting up kafkacat from inside docker container:
apt update
apt install kafkacat
kafkacat -b redpanda-0:19092 -L
Now, instead of localhost, we access kafka using redpanda-0:19092, by the name of the container from our docker compose file.
If that works, we still have one last thing to do: create an actual kafka topic. Log in to the redpanda container, and run this command (rpk should already be installed in that container):
rpk topic create inputThis creates a topic named “input”
Final steps: running the jobs, writing to kafka, checking the result
Now we are almost ready to go. We have to modify the App.kt file, pointing kafka bootstrap server to redpanda-0:19092, rebuild it with gradlew build, and run:
~/bin/flink-1.17.1/bin/flink run app/build/libs/app.jarFlink WebUI should now show a running job, without any exceptions. It will have 2 tasks - tokenizer (map) and counter (reduce). All should show zeroes in records sent/received, because our kafka topic is empty. To produce some results, go back to your redpanda container and execute this:
rpk topic produce input
**some messages will be read from stdin**
Whatever you type afterwards, will be published to this kafka topic, line by line.
I’ve typed this:
Harry
Hermione
Ron
Ron
Harry
Ron
Now, connect to flink taskmanager container, and and you should see the file my_file.txt with roughly this content:
Event(word=harry, count=2)
Event(word=hermione, count=1)
Event(word=ron, count=2)
Event(word=ron, count=1)
Conclusions
Getting into Flink can be quite daunting, especially if you don’t have a lot of context of the underlying technologies (kafka, docker, jvm) and trying to get into it from the “unusual” angle of Kotlin. Hopefully, this little guide will help you set everything up and get started.